


Showing posts with label Arts. Show all posts
Showing posts with label Arts. Show all posts
Tuesday, May 5, 2015
Friday, February 20, 2015

So
we’ve already shown you how to repurpose your old stacks of magazines, but in case none of
those tickled your fancy we’ve got one more DIY for you. DIY silhouette wall
art! Ta dah! This DIY Basic is
super simple. In just five easy steps you can create wall art that is fun,
original, and packed with color

Materials:
– magazines
– canvas/wood/board
– hot glue sticks
– pattern
– tape
– canvas/wood/board
– hot glue sticks
– pattern
– tape
Tools:
– hot glue gun
– scissors
– hot glue gun
– scissors
Instructions:
1. Print and cut out a silhouetted shape. (Download some ideas here!)
2. Tear out a bunch of magazine pages. Fold in half twice to get four small rectangles.
3. Start to roll! Try to keep the magazine rolls as tight as possible. Tape the end to avoid it from unraveling.
4. Hot glue your magazine roll-ups to your silhouette. Once the silhouette is covered, trim off the extra magazine pieces. This will reveal your silhouetted shape.
5. Glue magazine silhouette to your wood board.
1. Print and cut out a silhouetted shape. (Download some ideas here!)
2. Tear out a bunch of magazine pages. Fold in half twice to get four small rectangles.
3. Start to roll! Try to keep the magazine rolls as tight as possible. Tape the end to avoid it from unraveling.
4. Hot glue your magazine roll-ups to your silhouette. Once the silhouette is covered, trim off the extra magazine pieces. This will reveal your silhouetted shape.
5. Glue magazine silhouette to your wood board.
Time to get started! Cut out your silhouette from
scrap paper. You can download our adorable bear right here.

Time to get started! Cut out your silhouette from scrap paper. You can download our adorable bear right here.

Next you want to tear up those pages. First fold the page in half and tear down the center, then fold in half again and tear. Now you will have tons of small rectangles ready to roll.

Start at the edge and tightly roll the page into a cylinder. Secure the end with a piece of tape.

You’re going to need a lot of roll-ups ;) Try to pick magazine pages that have fun colors!

Using the hot glue gun, glue the roll ups onto your silhouette. Don’t worry about covering the smaller sections. Once you trim off the excess roll up you will have smaller pieces that will fit into those tiny spaces quite perfectly!

Trim the excess magazine to reveal your silhouetted shape. Remember, don’t throw away those tiny pieces.

Patch up those paws!


Time to mount your silhouette to a board. We used a thin wood board that we found at the art store. You can use wood, cardboard, illustrator board, etc. You could even go directly on the wall.

This bear is ready to hang.


Thursday, December 18, 2014
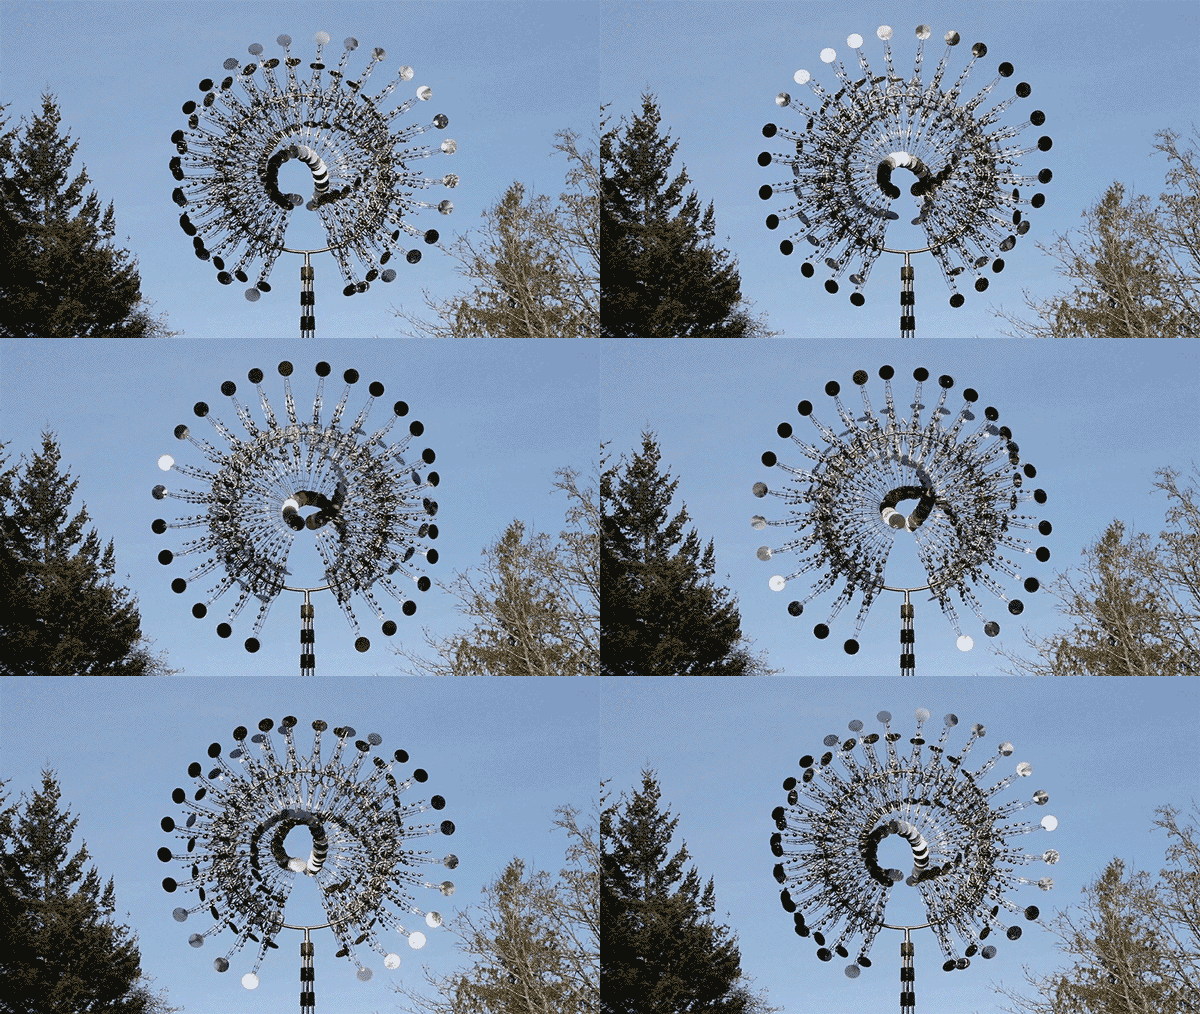
Wind Sculpture by Anthony Howe
 Expansion by Paige Bradley [New York, USA]


De Vaartkapoen [Brussels, Belgium]

Sinking Building [Melbourne, Australia]
 The Bliss Project by Marco Cochrane


Wire Fairy by Fantasy Wire [UK]
Mustangs By Robert Glen [Las Colinas, Texas, USA]
Politicians Discussing Global Warming
Break Through From Your Mold By Zenos Frudakis [Philadelphia, Pennsylvania, USA]
People Of The River By Chong Fah Cheong [Singapore]
The Knotted Gun [Turtle Bay, New York, USA]
Les Voyageurs [Marseilles, France]
De Vaartkapoen [Brussels, Belgium]
Sinking Building [Melbourne, Australia]
Wednesday, December 17, 2014
" Toilet Paper Roll Wall Art "

I literally have been saving my rolls for. ever. I’ve been holding on to them wanting to create some type of focal wall art and it was finally time to get er done! I wanted to add a mirror to the piece because the kitchen only has a small window and doesn’t get a lot of light so anything that can reflect light I’m all for.
Here’s what my toilet paper wall art turned into!

Ok let’s get down to the nitty gritty. Here’s exactly how I made this beauty happen.
The first thing I did was flatten my rolls and make 1/2″ marks.

Next, I cut them up. I also used paper towel rolls. I didn’t actually count
how many I used but I’m gonna take a guess that I used about 20 TP rolls and 6 PT rolls.

Then, I took 4 pieces and glued them together using a hot glue gun.


I continued doing this until I had about 40.

Then I took the mirror I was going to use (10″ mirror purchased at Joann’s for $8) and placed it on the floor and started adding all the circles around keeping in mind that I wanted to keep it in a circle.


At this point when I looked at it I felt it resembled a snowflake so I had to figure out how to completely round it out. I ended up making something that looked like a tulip to fill in the spaces. I glued two pieces together about a third in and then another two pieces right on the edge then attached them to the piece.


At this point I made sure all the pieces were glued together using a drop of hot glue between pieces.
Cue great tip: Once it was all glued I blasted my hair dryer on it to melt away all those glue gun strings.

The next step was to spray paint it all and attach a 10″ embroidery hoop to the mirror to give it a finished look and to hold the whole thing together. I used ORB (Oil Rubbed Bronze).

Once everything was attached I used command strips on the back of the mirror and hung it up!


Wednesday, December 10, 2014
If you live in San Francisco, California, then you may be lucky enough to come across the art of Andres Amador. He doesn’t paint or sculpt. He prefers a medium that is temporary but absolutely beautiful: a sandy beach at low tide. He uses a rake to create works of art that can be bigger than 100,000 sq. ft. He spends hours creating these intricate masterpieces, knowing that the tide will soon come in and wash away his work forever.
For Andres, his art is “more about the process and less about the result.”

He knows that it will all be temporary.
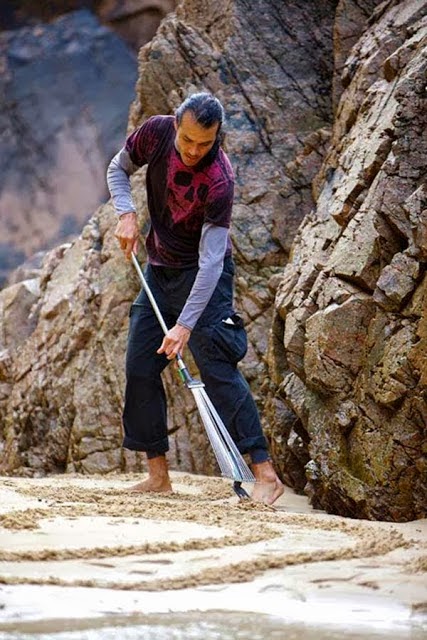
While making his beach mural explorations, he uses a rope as a guide so that he can make the geometric patterns.

When asked WHY he does it, Andre gives the best answer…

“The unanswerable question! Its fun. I get to be at the beach.”

Consider yourself lucky if you happen to stumble across one of his playa paintings, because it won’t be there long.


By raking up the wet sand at low tide, he is able to make contrasting sand colors.

He even offers his services, helping people propose.

Or even teaching others to create these beachscapes as part of a team building exercise.


According to Andres, it only takes a couple of hours once the tide is low enough to create the designs.
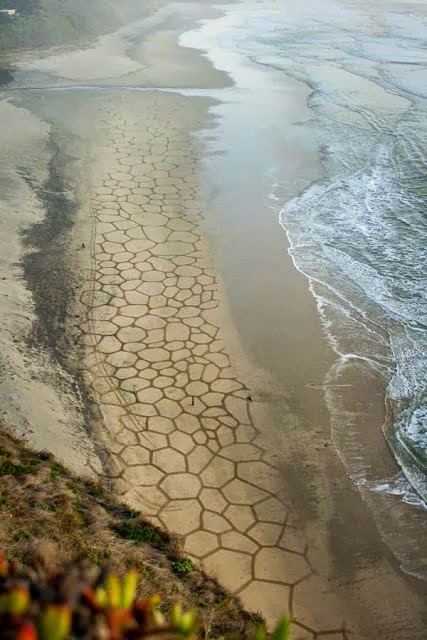


Andres’ creations are simply stunning and knowing that these delicate creations are temporary somehow makes them even more beautiful. You should definitely Like Andres On Facebook and Visit His Web Site where you can buy prints of his designs if you want. Share his work. It’s truly awesome.
Source
For Andres, his art is “more about the process and less about the result.”
He knows that it will all be temporary.
While making his beach mural explorations, he uses a rope as a guide so that he can make the geometric patterns.
When asked WHY he does it, Andre gives the best answer…
“The unanswerable question! Its fun. I get to be at the beach.”
Consider yourself lucky if you happen to stumble across one of his playa paintings, because it won’t be there long.
By raking up the wet sand at low tide, he is able to make contrasting sand colors.
He even offers his services, helping people propose.
Or even teaching others to create these beachscapes as part of a team building exercise.
According to Andres, it only takes a couple of hours once the tide is low enough to create the designs.
Andres’ creations are simply stunning and knowing that these delicate creations are temporary somehow makes them even more beautiful. You should definitely Like Andres On Facebook and Visit His Web Site where you can buy prints of his designs if you want. Share his work. It’s truly awesome.
Source
Subscribe to:
Posts (Atom)


.jpg)

